What wasn't a tradition was making them. My grandmother made her own enchilada sauce, beans, tortillas, fruit preserves, and grew a chunk of the food we ate, but I don't remember her ever making tamales(0). Every year someone would come around selling his grandmother's tamales. We'd get a good six dozen and be set. Later, when the tortilla/tamale shop opened up, we'd get a box of six dozen.
I remember not finding any decent tamales when I moved to Lubbock. It became my 'thing' to get a box of tamales at the store and pack it in my carry on bag on the trips back to school. I've since found Pedro's to be acceptable, but it was the first time I'd encountered open ended tamales.
So about fifteen years ago I started trying to make my own. This was before the "just look it up" stage of the internet, so I had to find books or packaging that would tell me how to do it. I've still got the recipes that were printed on the corn husk and masa bags in my serendipity book.
Just about everyone else who's blogged or written about making tamales tells you it's a Big Ordeal: it's so labor intensive and involved that you need a crowd of people helping you get it all done. And because it's such a big investment, you'd better damn well make several dozen so 1) there's enough for everyone, and 2) you don't have to do it again for a while. Hence the term "tamalada", which is essentially a tamale making party.
I agree with some of this. If you're going from pig to products in a weekend, then yeah, it's a Job. If you're looking for the taste without a whole lot of hassle, refill your drink and keep reading.
Tamalada for One
The filling The filling can be any damn thing you want. Growing up my parents used to buy "sweet tamales", which were filled with sugared rice and raisins. I couldn't stand them, but my younger siblings sucked them down. (Something they now deny). I was chatting with a coworker about making this year's batch and he mentioned his grandmother's "sweet tamales": pinto beans with brown sugar. I experimented with beans and maple syrup and I may have to kill the man. It's addictive.
Anyway, If you're going to make about a dozen tamales, you'll need about two cups of filling. These things are kind of like small pies or pastries - you'll use up a lot more dough than stuffing. If you find you've run out, find some leftovers and use that.
The dough So the basic recipe tends to be 2 cups masa(not cornmeal), 2 cups warm water or broth, some salt, some baking powder, and 1/2 to 2/3 cup lard. I've used shortening, I've used lard, I've used olive oil. The type of fat doesn't appear to me to affect the taste, but leaving it out altogether does. The cooked dough has a harder time coming away from the husk, and it's drier while eating. Also, fat in the shell blends better with any fat in the filling.
The wrap This is where it gets fun. You can order online, or find in any Mexican store, huge bags of corn husks. The cheaper packages have them all stuffed in willy nilly. More expensive brands have them unfolded and sorted, approximately the same size. Either way, you need to soak the things for a while. The minimum is about an hour(1). The hotter water the better.(2)
Sorting through the husks is time consuming, unless they've been presorted. Even then you're now on the clock - It's time to get that dough spread on the husk and the filling in and it all folded over.
Spoon method: This has you holding the husk in your hand, using the back of a spoon to try and evenly spread the dough over about a four or five inch square. The first few times you try it you will fail. It can be done but takes a lot of practice.
Spreader method: There is a tool that looks like a cement worker's smoother outer that you can get for about $8. This makes the job a little easier by giving your hand even pressure, but this still takes quite a bit of practice.
Press method: Plop a blob of dough on the husk. Fold it over, making a square. Get a spare husk and place it over any exposed dough. Smash with a tortilla press. Try not to smash too hard, as the husk will break and you've lost a husk.
I use what I call a Spreader-Press method: I do the prep I'd do for the press, and use the spreader to smash, and then cut and spread on open spots as needed.
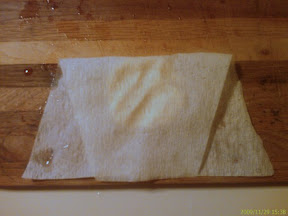
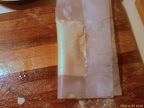
This year I spotted something new - parchment tamale wraps. They look for all the world like corn husks, but completely uniform.
 |
| From Tamalada for One |
Suddenly life got a lot easier. The wraps were 10 inches long, and wide enough to let me make a 5 inch square with the spreader press method.
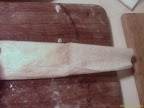
This gave me a nice, uniform stack.
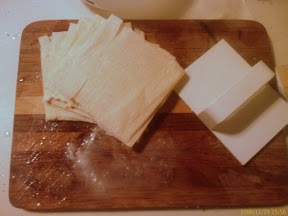 |
| From Tamalada for One |
So, having gone from hours of soak'n'sort time to "dip this thing for five seconds to get it wet", I decided to take the next logical step: using plain old parchment paper. Worked like a charm.
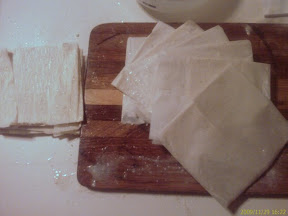 |
| From Tamalada for One |
By this time (about an hour and a half. The kids were home and I stopped a lot to take pictures) the leftover pork roast I'd been simmering in enchilada sauce was ready, by which I mean falling apart if you so much as looked at it funny.
Once more unto the dough!
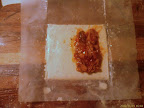
Then to the pot!
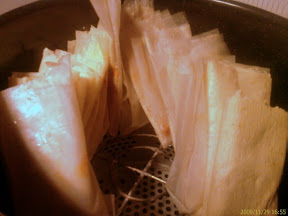 |
| From Tamalada for One |
Steam for 90 minutes. I use a lot of water in my tamale pot because I don't like refilling it. This means I need to prop up the floor of the stack with a colander, but I'm not making five dozen at a time, so I don't care. You'll know the tamales are done when the wrapper peels away easily from the cooked dough. The dough should spring back at all points when you poke it with your finger. Any dents and it goes back in the pot.
Dinner!
What's that? Where's the almost instant part? Well, when you have uniform, stackable tamale wraps left over, you can 1) find something else to put in them, or 2) Freeze them!
I had to interrupt a tamalada years ago due to illness. Since the wraps were already made, I put them in the freezer. Then forgot about them. About six months later I ran across them and decided to try it out. They defrosted well, cooked up just fine, and the rest is history.
You still need to do the initial 90 minute steaming. You can break tradition all you want, but physics and chemistry don't care who you are.
For the full set of the tamalada pictures, click the pic.
===================================
0. Dad says that when he was a kid, the tamales were part of a family task where the pig became tamales, chicharrones, ham hocks, chitlin's, bacon, and lard in a weekend.
1. I had good results one year using food dye in the husk's soaking water to color code the tamales by filling. With the colors we could tell right away what was inside.
2. Fortunately they can be stored in the refrigerator in the soaked state for about a week. After that they fall apart.
BONUS!Now this lady has it together!
DOUBLE BONUS! I am not worthy: